When it comes to projectors, achieving a crisp and clear image depends on several factors, and one of the most critical yet often overlooked is the Projector Throw Ratio. This simple numerical value—the ratio between the distance from the projector to the screen and the width of the projected image—can have a huge impact on image clarity, size, and overall viewing experience. Even small mistakes in calculating or using throw ratio can lead to blurry, distorted, or improperly sized images. In this blog, we will explore common throw ratio mistakes and how to avoid them to ensure sharp and vibrant projection.
Understanding Projector Throw Ratio
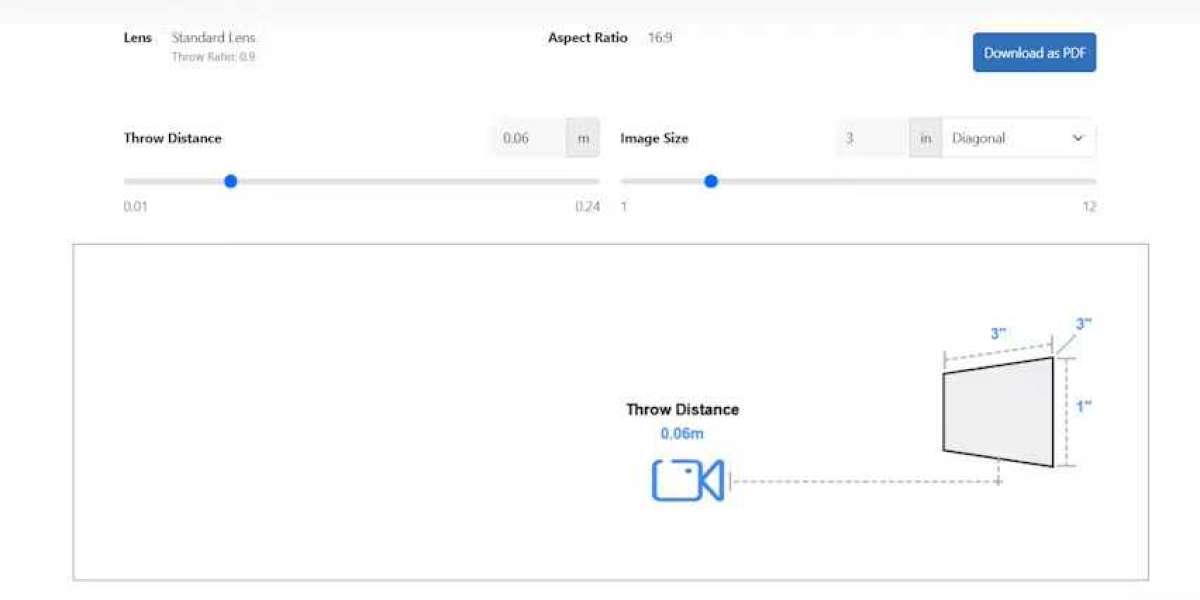
The Projector Throw Ratio is calculated using the formula:
Throw Ratio = Throw Distance ÷ Image Width
For example, if your projector is 12 feet from a screen that is 8 feet wide, the throw ratio is 1.5. This value determines how far the projector should be from the screen to produce a correctly sized image. Incorrect use of throw ratio can result in images that are too small, too large, or distorted, impacting the clarity and sharpness of the projection.
Common Throw Ratio Mistakes
Ignoring Throw Distance
One of the most frequent mistakes is neglecting the projector’s throw distance requirements. Placing the projector too close or too far from the screen can lead to images that are either too small or overshoot the screen edges. Both situations compromise image clarity, requiring digital zoom or keystone correction that reduces sharpness.Mismatched Screen Size
Using a screen size that does not match the projector’s throw ratio range is another common error. For example, pairing a 120-inch screen with a projector designed for a smaller image width will force the projector to stretch the image, resulting in pixelation and blurry edges.Improper Angles
Throw ratio calculations assume the projector is perpendicular to the screen. Installing the projector at an angle may require keystone correction, which can degrade picture clarity. Overreliance on keystone adjustments instead of correct placement often leads to uneven focus and blurred corners.Neglecting Lens Type
Fixed lens projectors have a single throw ratio, requiring precise placement. Using a fixed lens projector in a room that does not accommodate the correct throw distance can force the projector to operate outside its optimal range, causing blurry images. Zoom lens projectors offer flexibility, but improper adjustment can still reduce clarity.Ignoring Room Constraints
Furniture, ceiling height, and wall space can interfere with proper projector placement. Ignoring these constraints may lead to positioning the projector too close or too far from the screen, negatively affecting image clarity.Relying Too Much on Digital Scaling
When the throw ratio is incorrect, some users try to compensate using digital zoom or image scaling. While this can make the image fit the screen, it also reduces resolution and sharpness, resulting in a fuzzy picture.
How Throw Ratio Impacts Picture Clarity
Focus Accuracy
Projectors are designed to project a clear image at a specific throw distance. Incorrect throw ratio means the projector may not focus properly, leading to blurry images even when keystone correction is applied.Edge Sharpness
Images projected outside the optimal throw range often show distortion or softness at the edges. This reduces the overall perceived clarity and makes text or fine details harder to read.Brightness Uniformity
Projectors are calibrated to deliver uniform brightness at their intended throw distance. Placing the projector too far or too close can lead to hotspots or dim areas, impacting image clarity and viewing comfort.Resolution Integrity
Stretching an image to fit a screen due to incorrect throw ratio can reduce effective resolution, making high-definition content appear less sharp. Proper throw ratio maintains the intended pixel density and image quality.
Correcting Throw Ratio Mistakes
Measure Your Room and Screen
Before installation, measure the available throw distance and screen width. Use the formula:Throw Distance = Throw Ratio × Image Width
This ensures the projector is placed at the correct distance for optimal clarity.
Choose the Right Projector
Select a projector that matches your room size and screen dimensions. Consider short throw, standard throw, or ultra short throw options depending on the available space.Use Lens Shift or Zoom Features
Projectors with lens shift and zoom capabilities allow optical adjustment of image size and position without digital scaling, preserving clarity.Avoid Excessive Keystone Correction
Place the projector so that keystone adjustment is minimal. Excessive keystone correction distorts the image and reduces sharpness.Test Placement Before Permanent Installation
Temporarily position the projector and adjust distance and alignment. Observe image clarity, brightness, and edge sharpness before securing the projector.Consider Room Constraints
Take into account furniture, wall space, and ceiling height to select a projector that fits comfortably within your room while maintaining the correct throw ratio.
Practical Examples
Home Theater
A 120-inch screen paired with a projector with a throw ratio of 1.5:1 requires a throw distance of approximately 13 feet. Placing the projector at 10 feet would force digital zoom and reduce clarity. Correcting the throw distance restores sharpness across the entire screen.
Classroom Setup
A 100-inch screen in a classroom with a short throw projector (throw ratio 0.8) allows placement 7–8 feet away from the screen. Misplacing the projector even slightly can result in soft edges and unclear text, highlighting the importance of throw ratio calculations.
Outdoor Movie Night
For backyard movie nights, a standard throw projector placed too close to a large screen can produce a dim and fuzzy image. Selecting a projector with the appropriate throw ratio and distance ensures bright, clear images visible to all viewers.
Conclusion
Understanding and correctly applying the Projector Throw Ratio is essential for maintaining picture clarity. Mistakes in throw distance, screen size selection, projector placement, or overuse of digital corrections can result in blurry, distorted, or poorly aligned images. By measuring your room, choosing the right projector, and using optical adjustments like zoom and lens shift, you can avoid these common mistakes and achieve sharp, vibrant, and immersive projections. Proper attention to throw ratio ensures that your home theater, classroom, or outdoor movie setup delivers the best possible viewing experience for all audiences.
Read more: https://ivebo.co.uk/read-blog/180798